THREECOOKINGSISTERS
  • HOME
  • BAKE!
    • BREAD >
      • Applesauce Muffins
      • Banana Bread
      • Banana Bread
      • Blueberry Buckle Coffee
      • Blueberry Cream Muffins
      • Buttery Soft Rolls
      • Chocolate Chocolate Chip Muffins
      • Crescent Rolls
      • A Proper Crumpet
      • Danish Puff Pastry
      • Easy Corn Bread
      • Lemon Blueberry Bread
      • Lemon Poppy Seed Bread
      • Mom's Drop Doughnuts
      • Orange Bread
      • Popovers
      • Raised Doughnuts
      • Pumpkin Chocolate Chip Muffins
      • Sweet Cornbread Cake
      • 100% Whole Wheat Bread
      • Terry's Favorite Rye Bread
      • Zucchini Bread -- Seattle
      • Zucchini Bread -- Texas
    • Cookies >
      • Best Big, Fat, Chewy Chocolate Chip Cookies
      • Cheesecake Cookies
      • Coconut Macaroons
      • Date Balls
      • Elisenlebkuchen #1
      • Elisenlebkuchen #2
      • Gingerbread Cookies
      • Gingerbread Pan Cookie
      • Lebkuchen #3
      • Mary's Sugar Cookies - - Rolled
      • Molasses Crinkles
      • Oatmeal Coconut Crispies
      • Peanut Blossom Cookies
      • Pecan Sandies
      • Red Velvet Cookies (cake-like "muffin top" cookies)
      • Robin's Perfect Sugar Cookies -- Perfect for Decorating!
      • (Magical) Royal Icing for Cookie Decorating
      • Russian Tea Cakes
      • Shortbread
      • Snickerdoodles
      • Spritz
      • Subway Cookie -- Sugar/Chocolate Chip Hybrid
      • Viennese Whirls
      • Waffle Iron Cookies - Chocolate Turtles
  • Recipe Index
  • Cooking Basics & Videos
    • Baker's Conversion Cheat Sheet
    • Baking Powder or Baking Soda?
    • Cooking Temperature Guidelines
    • How To Cooking Videos
    • Make a Boxed Cake Mix taste like a Bakery Cake
    • Secret to a Perfect Poached Egg
    • Substitutions
    • Tips for a Perfect Cake EVERY Time!
    • Top 10 Tips for Better Cooking
  • Family Traditions
  • About Us
  • Our Favorite Products
  • Papa Ray's Cabbage Rolls
  • Nikki's Chocolate Cake
  • No Fail Swiss Buttercream Frosting
  • Buttermilk Sourdough Pancakes
  • Vanilla Cake

easy home-Smoked Salmon

Better than any smoked salmon you'll buy, and a fraction of the cost. And an excuse to buy that smoker you've had your eye on. 
Super easy. Enjoy home-smoked Salmon in three easy steps. Recipe courtesy of sister Chris, who lives in Juneau (southeast Alaska).
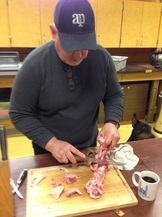
Step One.

Leave the skin on and cut the salmon filets into 1" x 1" squares. 
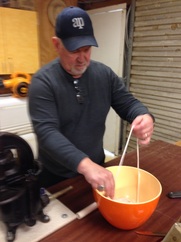
Step two.

Combine 1 cup brown sugar with 1 cup of pickling salt.  Layer fish pieces in a bowl and sprinkle sugar/salt mixture over the top of the first layer. Repeat, sprinkling the mixture between layers of salmon pieces. Let set for 1.5 hours. The salt mixture draws the moisture out of the fish. Drain and rinse in fresh water THREE TIMES. Pat dry on towels and lay on smoking racks. Let dry overnight.
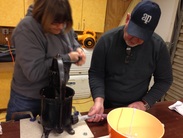
Step three.

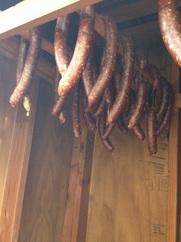
Place in fish smoker, leaving a bit of space between each piece for the smoke to pass through and kiss each piece of fish.  Add wood chips as needed to keep smoke going; about every hour to 90 minutes. Remove fish from smokehouse when it is to your desired level of smoke and cooking, usually 6-8 hours. 

easy freshly canned peaches

If you are lucky enough to live in peach-country, you can can your own peaches. Don't be intimidated. You can do it and impress yourself and your friends. Once you have invested in some basic canning supplies and jars, you'll be set to can your own fruit year after year.  And you can pass on this long-lost wonderful tradition. Peach canning instructions are courtesy of sister Robin who lives, with her family, in Northeast Texas. 

step one.
​gather your gear

Gather the things you'll need for canning your peaches. Here's your list: 
  • ​​Water Canner (with a base for inside to keep your jars off the bottom of the pan AND keep them from touching each other) with a lid
  • Jar Lifter
  • Canning jars, lids (rims and flat lids).  TIP! Check your jars and lids to be sure they're perfect. Imperfections can cause problems like broken jars, insufficient seals, etc. Wash everything in hot, soapy water and dry completely. 
  • Funnel, slotted spoon and a good knife. 
  • Fresh Peaches, water and sugar. Typically, 18 pounds of peaches should give you 7 to 8 quarter jars of peaches, depending on the size of your peaches (and how much waste happens in the peeling, pitting and slicing process). 
  • TIPS! I prefer the wide-mouth jars (narrow mouth jars make it hard to move things around inside the jar). Choose a funnel that fits your jars and is wide enough to pass the peaches through. You may want to can peach halves some day! 

step two.
Prep your pot, lids & rings

Get your clean canning pot ready. You don't need to buy a special canning pot (though they're handy). You can use a large, deep pot that will accommodate a canning rack. As long as it is large enough to fully immerse the jars in water by 1-2 inches – and allow the water to boil rapidly when covered – the pot will work.
  • Fill your pot about half to three-quarters full of water and bring to a slow simmer. 
  • Drop onto the bottom of your pot a rack to keep your jars from touching the bottom of your pot (and each other). ​
Grab a saucepan and fill it 3/4 full and bring to a simmer. Place your lids and rings into this pan and let them barely simmer while you're cleaning your peaches. You'll want tongs to pull each lid out when you're ready to add lids to your jars.

step three.
Prep your peaches

Rinse your peaches, grab a strainer or slotted spoon, and a knife and get prepping! Your prep is removing the peach skins and pit and slicing into the size you want.
  • Skin Removal:  Prepare a second pot of water (not your canner, it's simmering waiting for your peach-filled jars) and bring to a brisk simmer. One by one, drop each peach into the water (enough water to cover) for 2 to 3 minutes. Remove the peach and plunge into cool water (I just fill my sink with cold water). The skin of the peach should come off easily after the short hot water bath. TIP: use textured rubber gloves to 'skin' the peaches as the gloves help the skin slip off. 
  • Slice 'em up! Once peeled, remove the pit and cut the peach into slices. Note that you can slice, dice or leave them in halves. It's your choice. 
  • Place peach slices into the clean, dry jars and leave about an inch of head space (room between the fruit and the lid). 

step four.
syrup time

Make your simple syrup. t's easy. Just combine 6 cups of water with two cups of sugar in a sauce pan and heat/stir until dissolved. Need more syrup? Easy. Just follow the 3:1 ratio (3 cups of water to each cup of sugar). Make what you need.
  • Add your simple syrup to each jar of peaches, leaving 1/2” head space at the top.  Use a chopstick or other narrow utensil to release any air bubbles trapped between the layers of peaches. If your syrup level drops from releasing air bubbles, top off again (remember to leave a half inch of head space). Use enough syrup to cover the top of the peaches. If you need to remove a slice or two to make that happen, that's fine. 
  • Wipe the sides and rims of the jars with a damp cloth (I like the cloths warm as it helps clean up the sugary syrup quickly). Add a hot lid/cap to your jar and secure with a hot ring. Use a tong to get the hot lids and rings out of the saucepan you prepped in step two. 
  • NOTE: This is a lighter syrup. Other recipes use more sugar. Taste your peaches. If they are sweet, this should be fine. If they're not, adjust the sweetness of your syrup accordingly.  Heavy syrup uses a 6:4 ratio (six cups of water to 4 cups of sugar). 

step five.
​get canning

Everyone into the bath! It's canning time. 
  • Using  your jar lifter, place each full (fruit and syrup), capped jar into the hot water bath. The water should cover the tops of the jars, so adjust the water level accordingly.
  • Once the pot is full, cover with the lid, and bring the water to a soft boil.
  • Set your timer for 25 minutes. Do you live at a high altitude? If so, adjust your canning times. More info 

step six.
finish up & cool

After 25 minutes, your peaches are ready to leave the bath.
  • Lay large bath towels on your table/counter top. Your hot peaches will sit on these to cool (setting a hot jar on a cool counter can cause them to break from the sudden temperature change.
  • Pull each jar out of the canner and place on the towel to cool.  DO NOT re-tighten the rims at this time as it will cause the lids to pop off before cooling/sealing. 
  • Let the jars sit, undisturbed, for 24 hours. Then, check to be sure the seals are tight and that the center of the lid is sealed properly. Use your fingertips to try to pull the lid; it should hold firmly (don't use your nails to try to pry it off). If you touch the center of the lid, and it pops/flexes or the lid doesn't hold firm to the jar, the jar is NOT properly sealed. If it is sealed tight and doesn't 'pop', you've done it! Congratulations, you're a "Home Canner".
  • TIP! if you get a jar that doesn't seal, just refrigerate it and enjoy. 
  • Store your beautiful canned peaches in a cool, dry place (in your house, not in the unconditioned garage/shop). 

​Sister Robin's Husband Terry keeps up the German Tradition of Sausage making on the Ranch

Picture

​Terry comes from a German family that holds tight to its traditions of crafting their own sausage and beer the old fashioned way. He grew up learning the art of sausage making from his father, Ray Loreth, who learned the craft from his father who emigrated to the United States from Germany speaking not a word of English. Every year (often several times a year), Terry and his family get together to craft the BEST sausage and bratwurst in north Texas.  Now he enjoys the process with his family, carrying on this great Germany family tradition -- while enjoying a hand crafted bier during the process!  Prost!! 

Picture
Terry prepares the animal intestine for the sausage casing.

Picture
Robin works the meat grinder for the pork and venison. She also adds in the spices for sausage.

Picture
Chris, while visiting from Alaska, so Terry turns the handle on the old-fashioned meat press. No automation here! The sausage comes out and squeezes in to the casing.  Terry makes sure the size and shape are perfect.

Picture
Sausages need to hang and dry for a while before going in to the smokehouse. 

Picture
Robin and Terry checking the smokehouse to make sure the smoke and temperature are just right for the sausages.

Picture
The smoke is working on the sausages.  After 3-4 hours they will be ready to go in the refrigerator for the cool down process.

Picture
Terry needs to spray a little water on the cedar chip fire down below to help create more smoke and less flame.

Disclosure: Some of the links below are affiliate links. This means that, at zero cost to you, I will earn an affiliate commission if you click through the link and finalize a purchase.

Home Page

Recipes

Cooking Basics & Videos

Family Traditions

Picture
We Miss You and Love You Mom!
  • HOME
  • BAKE!
    • BREAD >
      • Applesauce Muffins
      • Banana Bread
      • Banana Bread
      • Blueberry Buckle Coffee
      • Blueberry Cream Muffins
      • Buttery Soft Rolls
      • Chocolate Chocolate Chip Muffins
      • Crescent Rolls
      • A Proper Crumpet
      • Danish Puff Pastry
      • Easy Corn Bread
      • Lemon Blueberry Bread
      • Lemon Poppy Seed Bread
      • Mom's Drop Doughnuts
      • Orange Bread
      • Popovers
      • Raised Doughnuts
      • Pumpkin Chocolate Chip Muffins
      • Sweet Cornbread Cake
      • 100% Whole Wheat Bread
      • Terry's Favorite Rye Bread
      • Zucchini Bread -- Seattle
      • Zucchini Bread -- Texas
    • Cookies >
      • Best Big, Fat, Chewy Chocolate Chip Cookies
      • Cheesecake Cookies
      • Coconut Macaroons
      • Date Balls
      • Elisenlebkuchen #1
      • Elisenlebkuchen #2
      • Gingerbread Cookies
      • Gingerbread Pan Cookie
      • Lebkuchen #3
      • Mary's Sugar Cookies - - Rolled
      • Molasses Crinkles
      • Oatmeal Coconut Crispies
      • Peanut Blossom Cookies
      • Pecan Sandies
      • Red Velvet Cookies (cake-like "muffin top" cookies)
      • Robin's Perfect Sugar Cookies -- Perfect for Decorating!
      • (Magical) Royal Icing for Cookie Decorating
      • Russian Tea Cakes
      • Shortbread
      • Snickerdoodles
      • Spritz
      • Subway Cookie -- Sugar/Chocolate Chip Hybrid
      • Viennese Whirls
      • Waffle Iron Cookies - Chocolate Turtles
  • Recipe Index
  • Cooking Basics & Videos
    • Baker's Conversion Cheat Sheet
    • Baking Powder or Baking Soda?
    • Cooking Temperature Guidelines
    • How To Cooking Videos
    • Make a Boxed Cake Mix taste like a Bakery Cake
    • Secret to a Perfect Poached Egg
    • Substitutions
    • Tips for a Perfect Cake EVERY Time!
    • Top 10 Tips for Better Cooking
  • Family Traditions
  • About Us
  • Our Favorite Products
  • Papa Ray's Cabbage Rolls
  • Nikki's Chocolate Cake
  • No Fail Swiss Buttercream Frosting
  • Buttermilk Sourdough Pancakes
  • Vanilla Cake